Headphones have become an indispensable part of our daily lives, providing a personal audio experience for music, podcasts, and calls. However, these delicate devices are prone to wear and tear, often leading to frustrating malfunctions. Before you rush to replace your favorite pair, consider the possibility of repairing them yourself. This comprehensive guide will walk you through the process of diagnosing and fixing common headphone issues, empowering you to extend the life of your audio gear while reducing electronic waste.
Understanding Headphone Anatomy
To effectively repair headphones, it's crucial to understand their basic components. Most headphones consist of:
The Jack Plug
This is the 3.5mm (or sometimes 2.5mm) connector that interfaces with your audio device. It typically has three contact points: the tip for the left audio channel, the ring for the right audio channel, and the sleeve for the ground.
The Cable
This carries the audio signal from your device to the speakers. Modern headphone cables often contain copper wires insulated with enamel, wrapped in a protective outer sheath.
The Drivers
These are the actual speakers in your headphones, converting electrical signals into sound waves. They consist of a diaphragm, voice coil, and magnet.
The Housing
This encases the drivers and can vary greatly in design, from in-ear buds to over-ear cups.
Common Headphone Problems
Before diving into repairs, it's essential to identify the specific issue. Here are some frequent problems:
Intermittent or No Sound
Often caused by a break in the cable or a loose connection at the jack or driver.
Sound in Only One Ear
This could be due to a wiring issue in the cable or a problem with one of the drivers.
Distorted Sound
May result from a damaged driver diaphragm or debris in the speaker grille.
Loose or Crackling Jack
Usually indicates wear at the connector, causing poor contact.
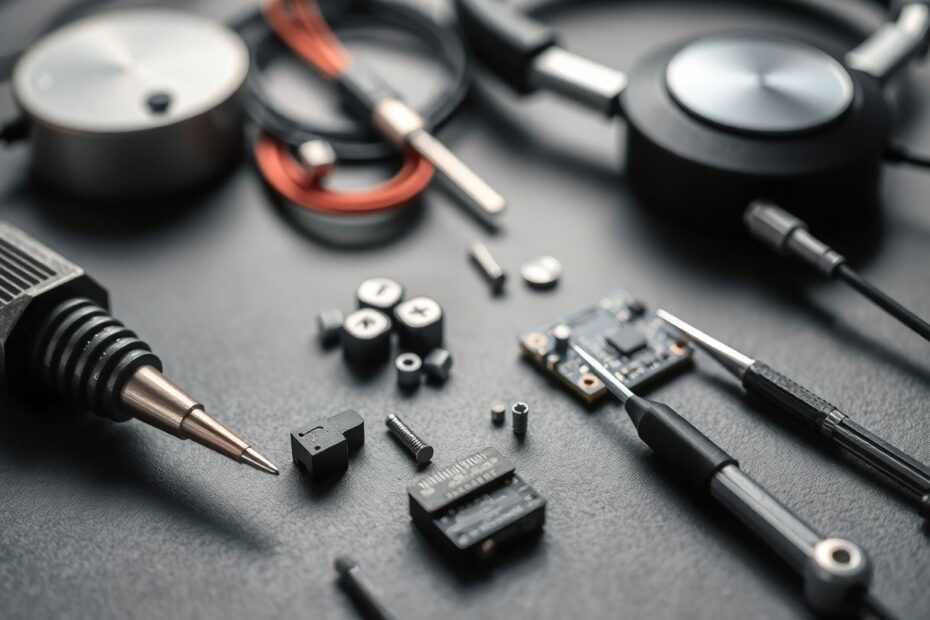
Tools and Materials for Headphone Repair
To tackle most headphone repairs, you'll need:
- Soldering iron and solder (60/40 rosin core recommended)
- Wire strippers or a sharp craft knife
- Multimeter for continuity testing
- Small screwdrivers (Phillips and flathead)
- Tweezers for handling small components
- Magnifying glass or loupe for detailed work
- Heat shrink tubing or electrical tape
- Replacement 3.5mm jack (if necessary)
- Isopropyl alcohol and cotton swabs for cleaning
Diagnosing the Problem
Before attempting any repair, perform these diagnostic steps:
- Test the headphones with multiple devices to rule out issues with the audio source.
- Inspect the entire length of the cable for visible damage or fraying.
- Check the jack plug for bent prongs or loose connections.
- Listen carefully to each earpiece, noting any differences in sound quality or volume.
Repairing a Broken Cable
Cable issues are among the most common headphone problems. Here's how to address them:
Locating the Break
Gently flex the cable while listening for changes in audio output. Mark any spots where you hear crackling or loss of sound.
Repairing the Cable
Cut the cable at the damaged point, ensuring clean ends.
Strip about 1cm of the outer insulation from both cable ends.
Identify and strip the individual wires inside. Typically, you'll find:
- Red wire for the right audio channel
- Green or blue wire for the left audio channel
- Copper or bare wire for the ground
Twist matching wires from both ends together.
Solder the connections, ensuring a solid bond.
Insulate each joint with heat shrink tubing or electrical tape.
Reinforce the repair by wrapping the section with additional tape or using a spring from a retractable pen for flexibility.
Replacing a Faulty Jack Plug
If the issue is with the jack plug, replacement is often the best solution:
- Cut the cable close to the old jack plug.
- Strip about 2cm of the outer insulation.
- Separate and strip the individual wires.
- Unscrew the cover of the new jack plug and thread the cable through.
- Identify the terminals on the new plug:
- Tip: Left channel
- Ring: Right channel
- Sleeve: Ground
- Solder each wire to its corresponding terminal.
- Carefully tuck the wires into the plug body and screw the cover back on.
Addressing Driver Issues
Problems with the drivers themselves can be more challenging but are not insurmountable:
- Carefully open the earcup or earbud housing, looking for seams or small screws.
- Inspect the driver for loose connections between the wire and the speaker terminals.
- Check the diaphragm for visible damage or debris.
- For loose connections, resolder the wires to the terminals.
- If the diaphragm is damaged, replacement of the entire driver may be necessary.
Preventive Measures and Maintenance
To extend the life of your headphones:
- Store them properly in a case or wrap the cable carefully to prevent stress.
- Always grasp the plug, not the cable, when disconnecting.
- Use a cable protector or strain relief near the jack plug.
- Clean your headphones regularly with a soft, dry cloth and isopropyl alcohol for stubborn dirt.
Advanced Troubleshooting
For more complex issues, consider these steps:
No Sound in One Ear
Use a multimeter to test for continuity along the cable. This can help pinpoint exactly where a break has occurred.
Distorted Sound
If cleaning doesn't resolve the issue, the problem may lie with the driver itself. Look for any physical damage to the diaphragm or voice coil.
Bluetooth Connectivity Issues
For wireless headphones, try resetting to factory settings. If problems persist, the issue may be with the Bluetooth module, which is often beyond DIY repair.
When to Consider Replacement
While many issues can be fixed at home, there are times when replacement might be the better option:
- When multiple components are damaged beyond repair
- If the cost of parts and tools exceeds the price of new headphones
- When dealing with complex circuitry in high-end or noise-cancelling headphones
The Environmental Impact of Headphone Repair
By repairing your headphones, you're not just saving money; you're also making an environmentally conscious choice. The electronics industry generates millions of tons of e-waste annually. By extending the life of your devices, you're reducing your contribution to this growing problem.
If repair isn't possible, always dispose of your headphones responsibly. Many electronics retailers offer recycling programs for audio equipment. These programs ensure that valuable materials are recovered and hazardous components are disposed of properly.
Conclusion
Repairing headphones is a rewarding skill that can save you money and reduce waste. With patience, the right tools, and a bit of practice, you can tackle many common headphone issues. Remember to always prioritize safety, work in a well-ventilated area, and don't hesitate to seek professional help for repairs beyond your comfort level.
As you become more adept at headphone repair, you'll find that these skills transfer to other electronic devices as well. You're not just fixing headphones; you're developing a deeper understanding of consumer electronics and contributing to a more sustainable approach to technology consumption.
Whether you're preserving a cherished pair of audiophile-grade headphones or giving new life to a budget-friendly set, the satisfaction of a successful repair is unmatched. So the next time your headphones falter, resist the urge to immediately replace them. With this guide in hand, you're well-equipped to diagnose, repair, and enjoy your audio gear for years to come.