In the ever-evolving landscape of maker technology, the Glowforge 3D laser printer has emerged as a versatile powerhouse, capable of transforming a wide range of materials, most notably leather and wood. This article will explore the capabilities, applications, and tips for using the Glowforge, with a special focus on working with leather and wood projects. As we delve into the intricacies of this remarkable tool, we'll uncover the science behind its operation and the artistry it enables.
The Science Behind Glowforge: More Than Just a Printer
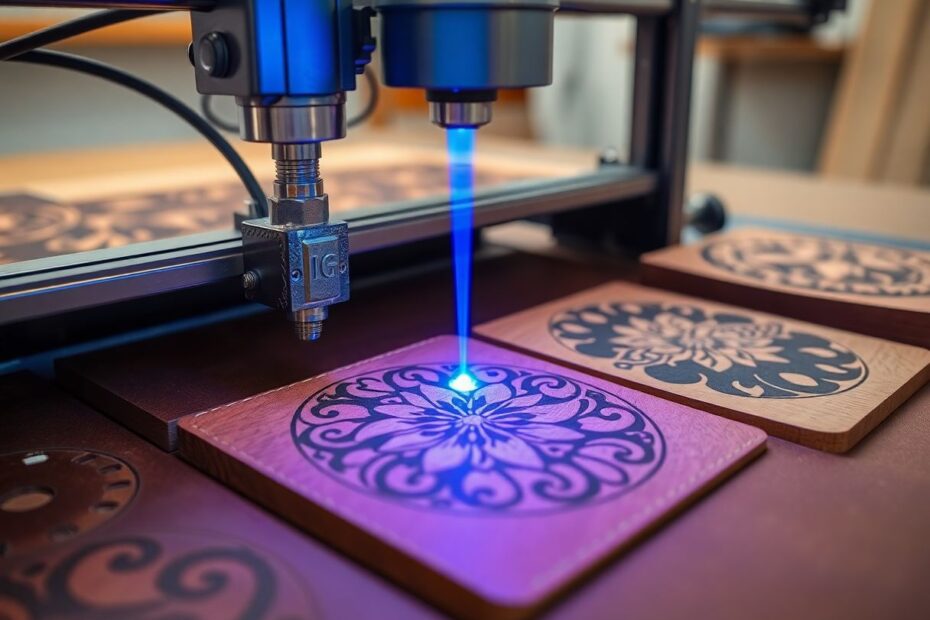
The Glowforge 3D laser printer is a marvel of modern engineering, utilizing advanced laser technology to cut, engrave, and shape materials with unprecedented precision. Unlike traditional 3D printers that build up layers of plastic, the Glowforge employs a high-powered CO2 laser, typically ranging from 40 to 45 watts, to manipulate materials through a process known as subtractive manufacturing.
The laser beam, generated by exciting CO2 molecules with electricity, is focused through a series of mirrors and lenses to create a beam as thin as a human hair. This beam can reach temperatures of over 1000°C, vaporizing or burning away material with micron-level accuracy. The wavelength of the CO2 laser, approximately 10.6 micrometers, is particularly effective for organic materials like wood and leather, as it's readily absorbed by these substances.
Glowforge's Key Features: A Technological Marvel
The Glowforge boasts an impressive array of features that set it apart in the world of digital fabrication:
High-precision laser cutting and engraving: With a resolution of up to 1355 DPI, the Glowforge can create intricate designs with astonishing detail.
Material versatility: Beyond wood and leather, it can work with acrylic, fabric, paper, and even certain foods.
Built-in cameras: A sophisticated camera system allows for easy project alignment and even the ability to trace hand-drawn designs.
User-friendly software interface: The cloud-based software simplifies the design process, making it accessible to both novices and experts.
Wi-Fi connectivity: This feature enables remote operation and seamless integration with design software.
Autofocus technology: The Glowforge automatically adjusts the focal point of the laser for materials of varying thicknesses.
Mastering Leather Projects: From Science to Art
Leather, with its organic composition primarily consisting of collagen fibers, responds exceptionally well to laser cutting and engraving. The key to successful leather work lies in understanding the material's properties and how they interact with the laser.
Selecting the Ideal Leather
When choosing leather for Glowforge projects, opt for vegetable-tanned varieties. This type of leather is treated with tannins derived from plant materials, resulting in a more stable and laser-friendly substrate. Vegetable-tanned leather typically has a pH between 3.5 and 5.0, which contributes to its ability to be shaped and molded when wet and then retain its form when dry.
Avoid chrome-tanned leather, as the chromium salts used in the tanning process can release harmful hexavalent chromium compounds when exposed to high temperatures. This not only poses health risks but can also damage the Glowforge's optical system.
For intricate cuts, thinner leathers in the 2-3 oz range (0.8-1.2 mm) work best. These allow for cleaner cuts with less charring. Thicker leathers, 4-6 oz (1.6-2.4 mm), are more suitable for sturdy projects but may require multiple passes or higher laser power.
The Art of Leather Preparation
Proper preparation is crucial for achieving optimal results with leather on the Glowforge. Begin by cleaning the leather surface with a slightly damp cloth to remove any dust or oils that could interfere with the laser. Allow the leather to dry completely, as moisture can affect how the laser interacts with the material.
Securing the leather flat on the Glowforge bed is essential for consistent results. Use magnets or weights to prevent warping or movement during the cutting process. For larger pieces, consider using a honeycomb cutting mat to provide even support across the entire surface.
Cutting and Engraving Techniques
When cutting leather, start with lower power settings and increase gradually. This approach allows you to find the sweet spot where the laser cuts through cleanly without excessive charring. For a 40-watt Glowforge, typical settings for 3 oz leather might be around 500 speed and 70% power, but these can vary based on the specific leather and desired outcome.
Multiple passes at lower power often yield cleaner results than a single high-power pass, especially for thicker leathers. This technique reduces heat buildup and minimizes the risk of scorching. Always keep the air assist feature on, as it helps blow away debris and smoke, resulting in cleaner cuts and reduced charring.
Engraving leather offers a wide range of creative possibilities. Light engraving at high speeds can create subtle, elegant designs, perfect for logos or decorative patterns. Deeper engraving, achieved with lower speeds and higher power, allows for more contrast and texture, ideal for creating raised designs or text.
Experiment with different power and speed combinations to achieve various effects. For instance, a setting of 1000 speed and 40% power might create a light, surface-level engraving, while 500 speed and 60% power could produce a deeper, more pronounced effect.
Wood Projects: Harnessing Nature's Versatility
Wood, with its diverse grain patterns and densities, offers a unique canvas for Glowforge projects. The key to success lies in understanding how different wood types interact with the laser and how to optimize settings for each.
Choosing the Right Wood
Hardwoods like maple, cherry, and walnut are excellent choices for laser cutting. Their dense structure allows for clean, precise cuts with minimal charring. The Janka hardness scale, which measures the resistance of wood to denting and wear, can be a useful guide. Woods with a Janka rating between 1,000 and 2,000 lbf (4,400 to 8,900 N) tend to work well with laser cutting.
Plywood and MDF (Medium-Density Fiberboard) are popular choices for larger projects due to their consistency and stability. However, be cautious with the glues used in these engineered woods, as some can emit harmful fumes when cut. Look for laser-safe plywood that uses formaldehyde-free adhesives.
Avoid pressure-treated lumber or woods with high resin content, as these can release toxic fumes when heated. Additionally, painted or varnished woods should be approached with caution, as the coatings may contain chemicals that become hazardous when vaporized.
Preparing Wood for Laser Cutting
Proper preparation of wood is crucial for achieving clean, precise cuts and engravings. Start by sanding the wood surface to achieve a smooth finish. This not only improves the aesthetics of the final product but also ensures more consistent laser interaction across the surface.
Remove any dust or debris thoroughly, as these particles can interfere with the laser and potentially cause flare-ups. For areas you don't want affected by smoke or laser etching, use painter's tape as a mask. This tape is designed to leave minimal residue and can be easily removed after the cutting process.
Secure the wood firmly to the Glowforge bed to prevent any movement during cutting. Even slight shifts can result in misaligned cuts or inconsistent engraving depths.
Advanced Cutting and Engraving Techniques
When cutting wood, adjust your settings based on both the type of wood and its thickness. Harder woods generally require more power or multiple passes, while softer woods may cut easily but are more prone to charring. For example, a piece of 1/4 inch birch plywood might require settings around 500 speed and 90% power on a 40-watt Glowforge, while the same thickness of maple might need 300 speed and 100% power or multiple passes.
The grain direction of the wood can significantly impact the quality of your cuts. Cutting parallel to the grain often results in smoother edges, while cutting perpendicular to the grain may require more power to achieve clean cuts. Consider the grain direction when designing your projects for optimal results.
Engraving wood opens up a world of artistic possibilities. Light engraving can create subtle textures and shading, perfect for intricate designs or photorealistic images. Deep engraving, on the other hand, can produce dramatic shadow effects and three-dimensional textures.
Experiment with varying the laser's focus to achieve different engraving effects. A slightly defocused laser can create softer edges and more gradual shading, ideal for artistic projects. Conversely, a tightly focused beam produces sharper, more defined lines, suitable for text or precise geometric patterns.
Pushing the Boundaries: Advanced Projects and Techniques
As you become more proficient with the Glowforge, consider exploring more advanced techniques that combine leather and wood:
Inlaying: Create stunning contrasts by inlaying leather into wood or vice versa. This technique involves cutting precise shapes in one material and fitting pieces of the other material into these voids.
3D Assemblies: Design interlocking pieces that can be assembled into three-dimensional structures. This approach allows you to create larger objects than the Glowforge's bed size would typically allow.
Living Hinges: By cutting precise patterns into wood, you can create flexible sections that act as hinges. This technique is particularly useful for creating foldable or adjustable wooden items.
Mixed-Media Art: Combine laser-cut wood and leather elements with other materials like acrylic or fabric to create unique, multi-textured pieces.
Layered Designs: Build depth and complexity in your projects by layering multiple pieces of cut or engraved material.
Troubleshooting and Maintenance: Ensuring Optimal Performance
Even with careful preparation, challenges may arise. Here are solutions to common issues:
Inconsistent cutting depth often results from uneven material surfaces. Use a honeycomb cutting mat or create a custom jig to keep materials perfectly level. For very thin or flexible materials, consider using a light spray adhesive to temporarily attach them to a backing board.
Scorch marks on leather or wood can be minimized by reducing power settings or increasing speed. Masking the surface with transfer tape before cutting can also protect the material from smoke stains. For light-colored leather, apply masking tape to the surface before cutting and remove it immediately after to prevent adhesive residue.
Warping of thin wood can be prevented by using a cutting mat to provide even support. For very thin veneers, a light spray adhesive can temporarily attach them to a backing board, ensuring they remain flat during the cutting process.
To maintain your Glowforge for optimal performance:
Clean the lens and mirrors regularly with a lens cleaner specifically designed for CO2 lasers. Any residue on these optical components can reduce laser power and affect cutting quality.
Vacuum the interior after each use to remove debris. Pay special attention to the laser tube and ventilation system.
Keep the cooling vents clear of obstructions to prevent overheating. The laser tube's efficiency is highly dependent on proper cooling.
Update the firmware regularly to benefit from improved performance and new features. Glowforge frequently releases updates that can enhance your machine's capabilities.
Periodically check and tighten any loose screws or fittings. The vibrations from regular use can sometimes cause components to loosen over time.
Conclusion: The Future of Digital Fabrication
The Glowforge 3D laser printer represents a significant leap forward in accessible digital fabrication technology. By combining precise laser technology with user-friendly software, it has opened up a world of creative possibilities for both hobbyists and professionals alike.
As we look to the future, we can expect to see further advancements in laser technology, potentially including higher-powered lasers for faster cutting, improved camera systems for even more precise alignment, and expanded material compatibility. The integration of artificial intelligence and machine learning could lead to smarter automated settings and even predictive maintenance capabilities.
The Glowforge has already transformed how we approach personalized manufacturing and bespoke creations. As the technology continues to evolve, we can anticipate even more innovative applications across various industries, from fashion and accessories to interior design and small-scale manufacturing.
For those embarking on their Glowforge journey, remember that mastery comes with experimentation and practice. Don't be afraid to push the boundaries of what's possible with leather and wood. Each project is an opportunity to learn and refine your skills, contributing to the growing community of digital fabrication enthusiasts.
As we continue to explore the intersection of technology and craftsmanship, the Glowforge stands as a testament to the power of putting advanced tools in the hands of creative individuals. It's not just a machine; it's a gateway to bringing imaginative ideas to life, limited only by the bounds of our creativity.