In the ever-evolving landscape of personal computing, the dream of owning a miniature supercomputer has captivated tech enthusiasts for years. Thanks to the innovative Turing Pi 2 board, that dream is now within reach. This comprehensive guide will walk you through the intricate process of constructing a powerful home cluster using the Turing Pi 2 and Raspberry Pi Compute Modules, opening up a world of possibilities for distributed computing, home labs, and edge computing applications.
Understanding the Turing Pi 2: A Revolution in Home Computing
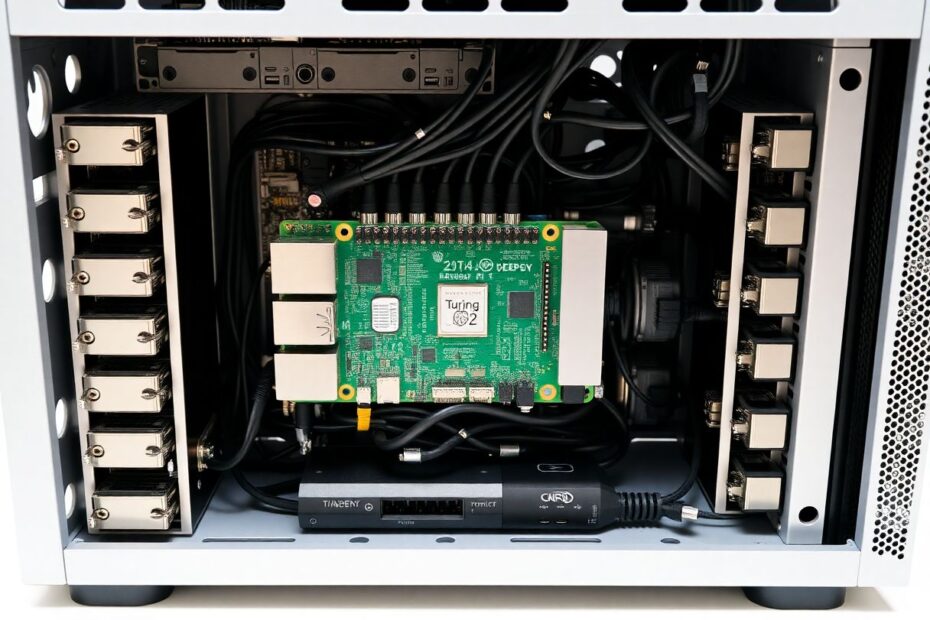
The Turing Pi 2 represents a significant leap forward in the realm of personal cluster computing. This Mini-ITX form factor board is designed to accommodate up to four Raspberry Pi Compute Modules, transforming them into a cohesive and powerful computing cluster. But the Turing Pi 2 is more than just a simple cluster board; it's a versatile platform that pushes the boundaries of what's possible in home-based high-performance computing.
At the heart of the Turing Pi 2's appeal are its impressive technical specifications. The board boasts a PCI Express port, enabling the integration of high-speed expansion cards such as GPUs or network adapters. Two NVME ports provide lightning-fast storage options, while two SATA ports offer additional storage flexibility. A dedicated USB port for flashing Compute Modules streamlines the setup process, and an HDMI port facilitates easy debugging and monitoring.
The Compelling Case for Building a Turing Pi 2 Cluster
The decision to embark on a Turing Pi 2 cluster project is driven by several compelling factors. First and foremost, it presents an unparalleled learning opportunity. By building and managing your own cluster, you gain hands-on experience with complex concepts like distributed computing, containerization, and orchestration using technologies such as Kubernetes. This practical knowledge is invaluable in today's tech-driven job market.
From a financial perspective, the Turing Pi 2 offers a cost-effective alternative to traditional server setups. By leveraging the power of Raspberry Pi Compute Modules, you can create a multi-node system capable of handling significant computational tasks at a fraction of the cost of commercial server hardware. This makes high-performance computing accessible to hobbyists, students, and small businesses alike.
Energy efficiency is another key advantage of the Turing Pi 2 cluster. Raspberry Pi modules are renowned for their low power consumption, making a Turing Pi 2 cluster an environmentally friendly choice for continuous operation. This efficiency translates to lower electricity costs and a reduced carbon footprint compared to traditional desktop or server configurations.
The compact nature of the Turing Pi 2 cannot be overstated. Its Mini-ITX form factor allows for a remarkably small footprint, making it ideal for home labs or office environments where space is at a premium. Despite its size, the cluster doesn't compromise on power or versatility.
Perhaps most exciting is the sheer versatility of a Turing Pi 2 cluster. From serving as a robust home automation hub to functioning as a personal cloud server or a development testbed for distributed applications, the possibilities are virtually limitless. This flexibility allows tech enthusiasts to continually explore new projects and use cases, ensuring that the cluster remains a valuable and evolving tool in their tech arsenal.
Planning Your Cluster: A Blueprint for Success
Before diving into the build process, it's crucial to carefully plan your cluster configuration. A well-thought-out plan will ensure that your Turing Pi 2 cluster meets your specific needs and performs optimally. Here's a suggested high-performance setup that balances power, storage, and connectivity:
- 4x Raspberry Pi 4 Compute Modules (8GB RAM each)
- 1x 1TB NVMe SSD for ultra-fast shared storage
- 1x 2TB SATA SSD for additional storage capacity
- 1x Wi-Fi 6 card for high-speed wireless connectivity
- 1x Mini-ITX case with good ventilation
- 1x 200W SFX power supply for ample power headroom
This configuration provides a robust foundation for a wide range of applications, from running containerized microservices to hosting a media server or functioning as a powerful home automation hub.
The Build Process: From Components to Cluster
1. Gathering Your Components
The first step in your Turing Pi 2 journey is assembling all the necessary components. In addition to the core items listed in the configuration above, you'll need:
- Turing Pi 2 board
- Compute Module adapters (if required for your chosen CM4 modules)
- High-quality thermal paste
- Low-profile CPU coolers for each Compute Module
- A precision screwdriver set
- Anti-static wrist strap for safety
Sourcing these components from reputable suppliers ensures reliability and compatibility. Many tech enthusiasts prefer to purchase from specialized Raspberry Pi retailers or well-known electronics distributors to guarantee authenticity and support.
2. Preparing the Compute Modules
Proper preparation of the Compute Modules is crucial for optimal performance and longevity. Begin by applying a thin, even layer of high-quality thermal paste to the main chip on each Compute Module. This step is critical for efficient heat transfer to the cooling solution.
Next, carefully attach the low-profile CPU coolers to each module. These coolers are essential for maintaining safe operating temperatures, especially when the cluster is under heavy load. Some enthusiasts opt for custom cooling solutions, such as 3D-printed heatsinks or even liquid cooling setups for extreme performance.
If your chosen Compute Modules require adapters, now is the time to securely attach them. Ensure all connections are firm and properly aligned to prevent any issues during operation.
3. Installing Compute Modules on the Turing Pi 2
With the Compute Modules prepared, it's time to install them onto the Turing Pi 2 board. This process requires precision and care. Align each module with its designated slot on the board, ensuring the connectors match perfectly. Apply gentle, even pressure to seat each module fully. A properly installed module will sit flush with the board and feel secure.
During this step, it's crucial to handle the components with care and use an anti-static wrist strap to prevent any accidental damage from static electricity. The Turing Pi 2 board and Compute Modules are sensitive electronic components, and proper ESD (Electrostatic Discharge) precautions are essential.
4. Case Assembly and Component Integration
Selecting the right case for your Turing Pi 2 cluster is more than just an aesthetic choice; it plays a crucial role in cooling and overall system performance. Look for a Mini-ITX case with good ventilation and enough space to accommodate your chosen components comfortably.
Start by installing the Turing Pi 2 board into the case, securing it with the provided standoffs and screws. Next, install the power supply, ensuring all necessary power connectors are accessible. Cable management is key here – take the time to route cables neatly to optimize airflow and maintain a clean, professional appearance.
Install the NVME and SATA SSDs in their respective slots, ensuring they are properly seated and secured. If your case has dedicated drive bays, use them to keep your storage devices organized and well-ventilated.
Finally, install the Wi-Fi card in the PCI Express slot. Depending on your chosen card, you may need to attach antennas for optimal signal strength. Some enthusiasts opt for external antennas for better reception, especially if the cluster will be located in an area with potential signal interference.
5. Flashing and Configuring the Compute Modules
With the hardware assembled, the next step is to prepare the software environment for each Compute Module. This process involves flashing the modules with the appropriate operating system and configuring them for cluster operation.
Connect a USB cable from your computer to the Turing Pi 2's USB flashing port. Download the latest version of Raspberry Pi OS or your preferred operating system compatible with the Raspberry Pi architecture.
Using the Turing Pi CLI tool, flash each Compute Module individually:
tpi flash -i /path/to/image -n {1-4}
This command allows you to specify the image file and target node number, streamlining the flashing process for multiple modules.
After flashing, it's crucial to enable SSH on each module to allow remote management. This can be done by creating an empty file named ssh in the boot partition of each module.
6. Network Configuration and Cluster Communication
Proper network configuration is the backbone of a well-functioning cluster. Connect the Turing Pi 2 to your network via Ethernet for the most reliable connection, or use the installed Wi-Fi card if wireless operation is preferred.
Assign static IP addresses to each Compute Module to ensure consistent communication within the cluster. This can be done by editing the /etc/dhcpcd.conf file on each module:
interface eth0
static ip_address=192.168.1.10X/24
static routers=192.168.1.1
static domain_name_servers=192.168.1.1
Replace 'X' with the appropriate number for each module (e.g., 101, 102, 103, 104).
A key advantage of a cluster is the ability to share resources across nodes. Setting up shared storage allows all nodes to access a common data pool, facilitating data-intensive tasks and ensuring data consistency across the cluster.
Format the NVME SSD and mount it on one of the Compute Modules. Then, install and configure the NFS server on this module:
sudo apt update
sudo apt install nfs-kernel-server
Edit the /etc/exports file to configure the NFS share:
/path/to/shared/storage *(rw,sync,no_subtree_check,no_root_squash)
On the other modules, install the NFS client and mount the shared storage:
sudo apt install nfs-common
sudo mount -t nfs [NFS_SERVER_IP]:/path/to/shared/storage /mnt/shared
Add an entry to /etc/fstab on each client node to ensure the shared storage is mounted automatically on boot:
[NFS_SERVER_IP]:/path/to/shared/storage /mnt/shared nfs defaults 0 0
8. Implementing Kubernetes with K3s
Kubernetes has become the de facto standard for container orchestration, and K3s offers a lightweight implementation perfect for edge computing and IoT scenarios like our Turing Pi 2 cluster.
On your control machine (which can be one of the cluster nodes or an external computer), clone the k3s-ansible repository:
git clone https://github.com/k3s-io/k3s-ansible.git
Configure the inventory file (inventory.yml) with your cluster's IP addresses and desired roles (server and agent nodes).
Run the Ansible playbook to install K3s across your cluster:
ansible-playbook playbooks/site.yml -i inventory.yml
This process automates the installation and configuration of K3s across all nodes in your Turing Pi 2 cluster, setting up a robust container orchestration platform.
Advanced Cluster Management and Optimization
With the basic cluster setup complete, it's time to explore advanced management techniques and optimizations that can take your Turing Pi 2 cluster to the next level.
Implementing a Robust Monitoring Solution
A critical aspect of cluster management is comprehensive monitoring. Prometheus, coupled with Grafana, offers a powerful solution for collecting and visualizing metrics from your cluster.
To set up Prometheus and Grafana:
- Deploy Prometheus using Kubernetes manifests or the Prometheus Operator.
- Install Grafana and configure it to use Prometheus as a data source.
- Create custom dashboards in Grafana to visualize CPU usage, memory consumption, network traffic, and other relevant metrics across your cluster.
This setup allows you to proactively identify performance bottlenecks, track resource utilization, and ensure the health of your cluster.
Load Balancing for Distributed Applications
Implementing a load balancer is crucial for distributing traffic across your nodes efficiently. MetalLB is an excellent choice for bare-metal Kubernetes clusters like our Turing Pi 2 setup.
To install MetalLB:
Apply the MetalLB manifests to your cluster:
kubectl apply -f https://raw.githubusercontent.com/metallb/metallb/v0.13.7/config/manifests/metallb-native.yamlConfigure an IP address pool for MetalLB to use:
apiVersion: metallb.io/v1beta1
kind: IPAddressPool
metadata:
  name: first-pool
  namespace: metallb-system
spec:
  addresses:
  - 192.168.1.240-192.168.1.250
Create a Layer 2 advertisement:
apiVersion: metallb.io/v1beta1
kind: L2Advertisement
metadata:
  name: example
  namespace: metallb-system
spec:
  ipAddressPools:
  - first-pool
With MetalLB configured, your cluster can now provide external IP addresses to LoadBalancer services, enabling seamless distribution of incoming traffic across your nodes.
Implementing a Service Mesh with Istio
A service mesh like Istio can significantly enhance the capabilities of your Turing Pi 2 cluster, providing advanced traffic management, security features, and observability.
To install Istio:
Download the Istio release and add the
istioctlclient to your path.Install Istio on your cluster:
istioctl install --set profile=demo -yEnable Istio injection for your default namespace:
kubectl label namespace default istio-injection=enabledDeploy the Istio ingress gateway and any additional Istio addons you require.
With Istio in place, you can implement advanced traffic routing, conduct A/B testing, and secure service-to-service communication within your cluster.
Practical Applications and Projects for Your Turing Pi 2 Cluster
The true power of your Turing Pi 2 cluster lies in its versatility. Here are some exciting projects to consider:
1. High-Performance Media Server
Deploy Plex or Jellyfin on your cluster to create a powerful media server capable of transcoding multiple streams simultaneously. Utilize the shared NVMe storage for your media library and leverage the distributed processing power for smooth playback and fast metadata scraping.
2. Personal Cloud Storage Solution
Implement NextCloud to create your own cloud storage platform. With the Turing Pi 2's storage capabilities, you can build a robust, self-hosted alternative to commercial cloud services, ensuring complete control over your data.
3. Advanced Home Automation Hub
Use Home Assistant as the core of a sophisticated home automation system. The cluster's processing power allows for complex automation rules, machine learning-based predictions, and integration with a wide array of smart home devices.
4. Distributed Machine Learning Laboratory
Leverage the combined power of your Compute Modules to create a distributed machine learning environment. Use frameworks like TensorFlow or PyTorch to train models across multiple nodes, accelerating experimentation and research.
5. Containerized Development Environment
Create isolated development environments for various projects using container technology. This setup allows you to maintain separate environments for different programming languages, frameworks, or project requirements without conflicts.
6. Private VPN Server
Implement OpenVPN or WireGuard to create a secure, self-hosted VPN server. This not only enhances your online privacy but also provides secure remote access to your home network and cluster resources.
7. Blockchain Node
Run a full node for cryptocurrencies like Bitcoin or Ethereum. The Turing Pi 2's processing power and storage capabilities make it well-suited for maintaining a blockchain node, contributing to network security and decentralization.
Conclusion: Embracing the Future of Home Computing
Building a Turing Pi 2 home cluster is more than just a technical project; it's a journey into the cutting edge of personal computing. This powerful and versatile setup opens doors to a wide range of applications, from practical home server solutions to advanced distributed computing experiments.
As you continue to explore and expand your cluster's capabilities, remember that the key to success lies in continuous learning and experimentation. The field of cluster computing is constantly evolving, with new tools, frameworks, and applications emerging regularly. Stay curious, keep pushing the boundaries of what your Turing Pi 2 cluster can do, and don't hesitate to share your experiences with the growing community of home cluster enthusiasts.
Your Turing Pi 2 cluster is not just a collection of hardware; it's a platform for innovation, a learning tool, and a gateway to the future of computing. Embrace the possibilities, tackle challenging projects, and enjoy the journey of discovery that comes with managing your own high-performance computing cluster. Happy clustering!