
Are you facing iPhone recovery mode? No need to worry! This post will give you alternative backup methods to safeguard your valuable data without relying solely on iTunes or iCloud.
Recovery Mode is an important iPhone troubleshooting feature, accessible by pressing certain button combinations during restart. It allows iTunes or Finder to reinstall iOS, wipe devices, or restore backups when fixing critical system issues.
However, a backup iPhone in recovery mode is essentially an emergency iOS repair tool – using it regularly for backups is overkill. Thankfully, iOS offers more versatile backup capabilities for everyday iPhone data protection beyond Recovery Mode.
In this article, we will explore key alternative backup methods available to users under normal conditions.
Part 1. Traditional Method: iTunes Backup in Recovery Mode
iTunes presents a conventional mechanism that iPhone users can utilize to generate device backups. The method requires you to tether your iPhone handset to a personal computer system. Also, you need to employ the iTunes desktop application to construct a replication of device data in a separate archive location.
However, this backup functionality through iTunes can only transpire while the iPhone operates in standard device mode. If the handset enters recovery mode, you must revert the device back to standard mode before iTunes allows backup execution.
Now, we will examine the procedural steps to recover from iOS device mode via iTunes when the device displays in recovery mode.
- First, connect your iPhone device to a PC or laptop and open iTunes.
- Force restart your phone, and do not release the buttons until the “Connect to iTunes” screen emerges. The method to force restart depends on your iPhone model.
- When you open your iTunes, you will see two options: Restore or Update. Select Update.
- You will need to wait until the downloading and installation process is complete and then set up your iPhone.
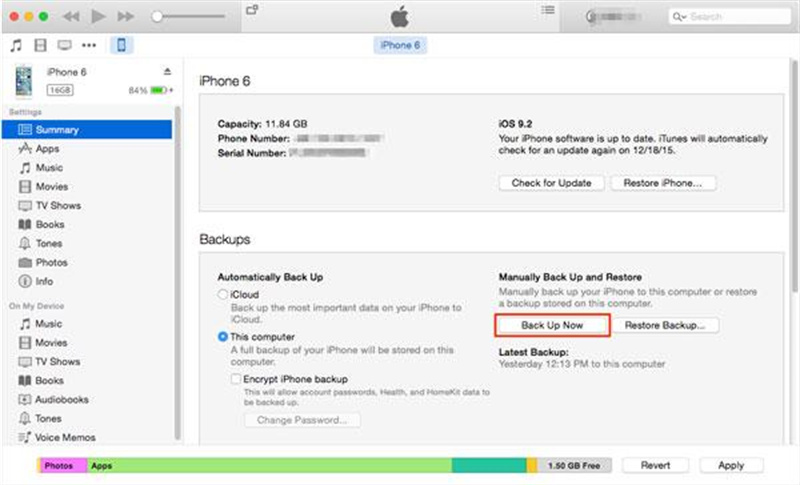
- Choose the device icon after you input the password and click trust the computer (if needed).
- Click on Backup Now to create a backup.
- Wait until the backup is completed.
Let’s explore the advantages and limitations of iTunes backup.
Benefits:
- iTunes backups are more complete and faster to restore than iCloud backups.
- iTunes backups are ideal for a full restore operation.
Drawbacks:
- You can’t back up your phone while in recovery mode.
- If your iPhone is in recovery mode, it can only be used to recover the iPhone by connecting the iPhone to iTunes with a USB cable.
- If you want to back up your iPhone, you need to exit recovery mode first.
- iTunes backups are time-consuming and cumbersome.
- You need a computer with enough disk space and the latest version of iTunes.
Part 2. Alternative Method 1: iCloud Backup in Recovery Mode
While iTunes has long been a reliable avenue for iOS users to back up and restore their devices, the landscape of data management continues to evolve.
An increasingly popular alternative is the iCloud Backup method, particularly when coupled with the Recovery Mode option. This wireless approach offers a seamless way to safeguard your data without the need for a computer.
Let’s delve into the details of how to execute this alternative method, exploring its benefits and drawbacks to empower users with a comprehensive understanding of their data management options in the iOS ecosystem.
- Repeat the first four steps we covered in the traditional method.
- After that, connect to a Wi-Fi network. Select Settings and tap on iCloud.
- Tap on iCloud Backup. Turn on iCloud Backup.
- Select Backup Now. Do not disconnect from the Wi-Fi network.
- Wait until the backup is completed.
Here are some benefits and drawbacks of this approach:
Benefits:
- Safety: iCloud is a reliable, trustworthy online backup option created and developed by experts in the field. You can relax knowing that your files are stored, backed up and safe should any irreversible damage occur to your iPhone.
- Sync feature: The convenience of having all of your data synced and in one place, no matter which device you happen to be using.
- Ease of use: iCloud ensures that ease of use is paramount.
- Free: Up to 5GB of free online storage.
Drawbacks:
- Confidentiality: The folks at Apple now have access to any data that’s backed up in iCloud.
- Security: Apple’s iCloud is definitely an intriguing target for hackers all over the globe.
- Limited storage space: If you need more space than the free 5GB, you can subscribe to an upgrade with a low monthly service charge.
Part 3. Alternative Method 2: Third-Party Software
If you are wondering how to back up your iPhone in recovery mode using third-party software options, consider using Wondershare Dr.Fone.
Dr.Fone is a comprehensive toolkit designed to address various iOS data management needs, including backup and recovery in Recovery Mode.
Here are some of the key features and advantages of Dr.Fone:
- Data Recovery: Fone can recover iPhone data. It has been found to be one of the more effective (and slower) data recovery apps for smartphones.
- System Repair: This feature allows you to fix the most common iOS and Android issues.
- Data Eraser: Fone can help you tidy up your phone by putting together duplicate photos and songs to free up space.
- Phone Manager: This feature lets you move music, ringtones, and other files between your phones and computers without needing iTunes.
- WhatsApp Transfer: It allows you to send and receive WhatsApp text messages between devices, even on different platforms such as iOS or Android.
- Screen Unlock: It allows you to unlock both Android and iOS devices.
- High Success Rate: It has a high success rate in recovering iOS data with 3 modes.
- Compatibility: Fone is compatible with new iPhone, iPad, and iPod models and iOS systems.
- Safety: Several different tests of the functions and features of Wondershare Dr.Fone show that the software is completely safe to use.
Here are the brief steps to use Wondershare Dr.Fone to recover from iOS device mode.
Manual Backup with Dr.Fone
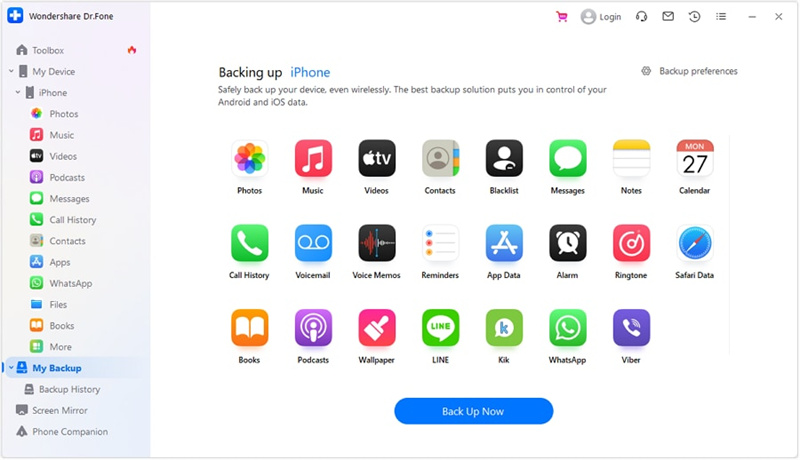
Step 1: Initiate Backup on Your Computer
Start the Dr.Fone application on your computer. Select the ‘My Backup’ option from the left-side menu. Click on ‘Back Up Now’ to begin the backup process of your iOS device.
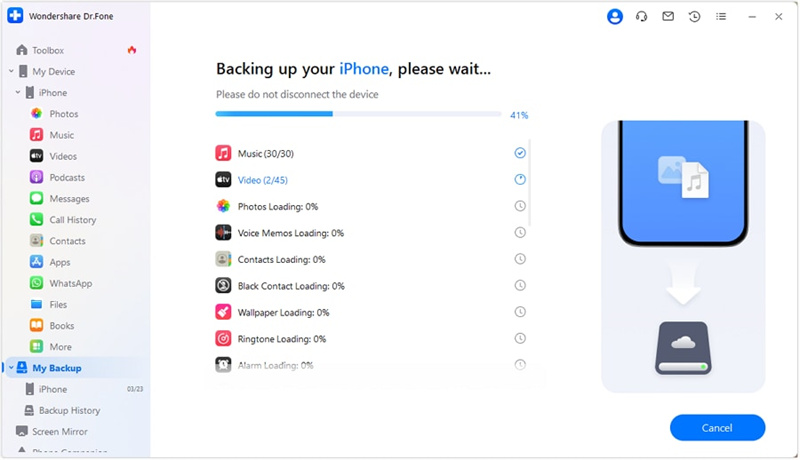
Step 2: Complete the Backup Process
Dr.Fone will automatically identify and back up data from your device. Wait for the process to finish. If you need to stop the backup, select ‘Cancel’.
Step 3: Finalize the Backup
After the backup is complete, a window will show the details of the backup. Click ‘View Backups’ to see all the backups made with Dr.Fone, or choose ‘Open in Folder’ to go directly to the location of the backup files.
Automatic Backup with Wondershare Dr.Fone
Step 1: Set Up Automatic Backup
Launch the Dr.Fone tool on your computer. Go to ‘My Devices’ > ‘Backup preferences’ to access various backup options.
Step 2: Connect the iOS Device and Computer
- Turn on the option next to ‘Enable Auto-Backup’.
- Make sure your iOS device and computer are on the same Wi-Fi network. This allows your device to automatically back up according to the set Backup Plan and Preferred Time.
Step 3: Access Backup History
Click on ‘Backup History’ to see the history of all iOS device backups. Press ‘View’ to examine the contents of each backup file by category.
Part 4. Comparison of Each Method
In this section, we will discuss the pros and cons of all the methods discussed above, and also we will look at the factors to consider when choosing the right backup method.
| Method | Pros | Cons |
| iTunes | · Free to use. · Can back up your iPhone/iPad.
| · Can only restore the entire backup to your iPhone, iPad, or iPod touch. · Requires a computer to back up and restore.
|
| iCloud | · Free for the first 5GB of storage. · Can back up your iPhone/iPad over Wi-Fi.
| · Can only restore the entire backup to your iPhone, iPad, or iPod touch. · Requires Wi-Fi to back up and restore.
|
| Dr.Fone | · Can back up and restore data more flexibly and selectively without overwriting existing data.
· Provides a detailed device report when you connect your phone to the computer.
· Can restore iCloud and iTunes backup data to any Android or iOS device.
| · More expensive to implement than iTunes and iCloud. |
When choosing the right method to backup iPhone in the recovery mode, consider the following factors:
- Cost:If you’re on a budget, iTunes and iCloud are free for basic use, while Dr.Fone is more expensive.
- Flexibility:If you want to back up and restore data more flexibly and selectively, Dr.Fone is a better choice.
- Convenience:If you want to back up and restore data without a computer, iCloud is a good option.
- Compatibility:If you want to restore iCloud and iTunes backup data to any Android or iOS device, Dr.Fone can do that. iTunes and iCloud can only be restored to iOS devices.
Conclusion
In summary, while using iTunes to backup iPhones in recovery mode is a traditional method, there are several alternative methods that offer more flexibility and convenience. iCloud backup provides a wireless and computer-free approach, while third-party software like Wondershare Dr.Fone offers selective backup, data preview, and encryption capabilities.
The best method for you depends on your individual needs and preferences. If you prioritize convenience and don’t mind the time commitment, iCloud backup is a good choice. If you prefer more flexibility and control over your backup, consider using Dr.Fone.