
Did you know that it is very easy to change your AirDrop name from your iPhone or iPad settings menu? Renaming makes it easier to recognize your AirDrop from among other devices. In this post, we’ll discuss everything that you need to know with regards to how to change your AirDrop name. Keep reading for the details……
Transferring files from between users of Apple devices is very simple, thanks to AirDrop. Among other advantages, AirDrop guarantees the safety and integrity of the transferred files. Also worth mentioning is that it makes for a faster file transfer of files via Wi-Fi connectivity in just a few easy steps. That being said, let’s get to how to change your AirDrop Name.
Change AirDrop name on iPhone
When it comes to changing your AirDrop name, here are the steps to follow:
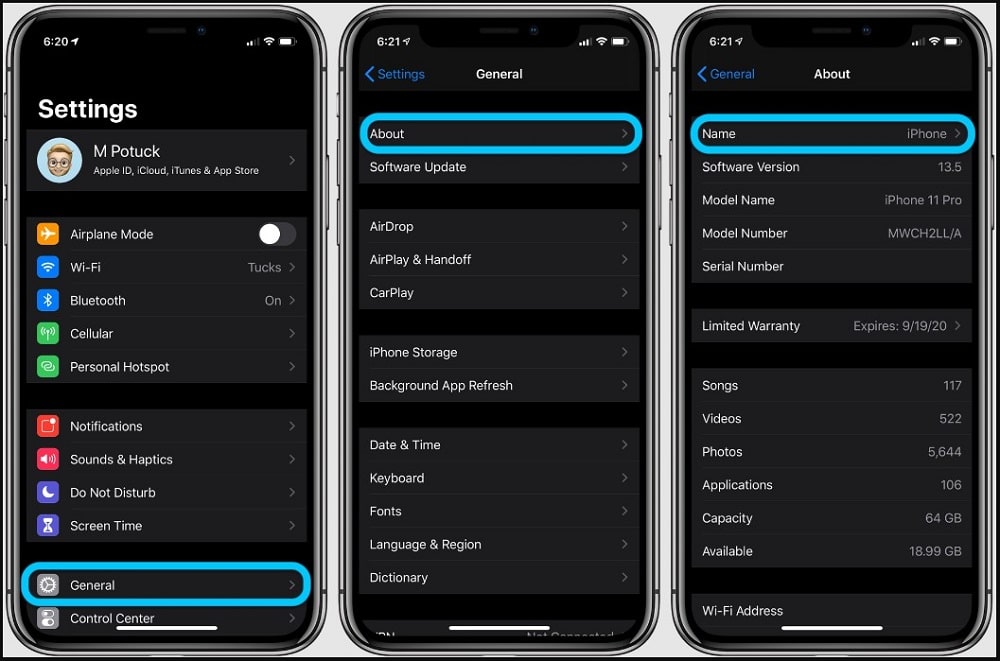
Step 1: Go to Settings.
Step 2: Tap on General.
Step 3: Tap on ‘About’ and then tap on “Name” enter the new name for your AirDrop device, and save the changes.
Change your Airdrop name on Mac
Besides changing the AirDrop name on iPhone or iPad, it is also possible to get it done on your PC or Mac. Here are the steps to get it done:
Step 1: On your Mac, click on the Apple icon situated in the upper left corner.
Step 2: Click on System Preferences.
Step 3: Click on Sharing.
Step 4: In the Computer Name box, type your Preferred Name.
Step 5: Close the window.
Now you can send documents, videos, photos, etc., to other nearby devices via Airdrop with ease. The other users can quickly identify your device from amidst the crowd of AirDrop devices.
Update your contact card

The Airdrop feature works with your contacts, so changing your device’s name alone will not be successful. You need to update your contact card as well. To do that, follow the steps below:
Step 1: Launch your iPhone’s Dialling app.
Step 2: Tap on Contacts at the bottom.
Step 3: Tap on the Contacts Card at the top of the screen.
Step 4: Tap Edit at the upper right corner.
Step 5: Key in your Preferred Name “will be the name displayed on other people’s devices as you transfer data on Airdrop”.
Step 6: At the upper right corner, tap ‘Done’ to save the changes.
Step 7: If you want to add a profile picture to your Contact Card, tap on Add Photo.
Display your Airdrop name after a name change
It might take some time for your new Airdrop name to appear on other devices after the change. If your name fails to appear:
Step 1: Go to Settings.
Step 2: Tap on General.
Step 3: Tap on Reset and then reset your Network Settings.
This will make your device restart, and your current Airdrop name will be displayed on the sender’s Airdrop List.
Send documents from smaller Apple devices to Mac via Airdrop
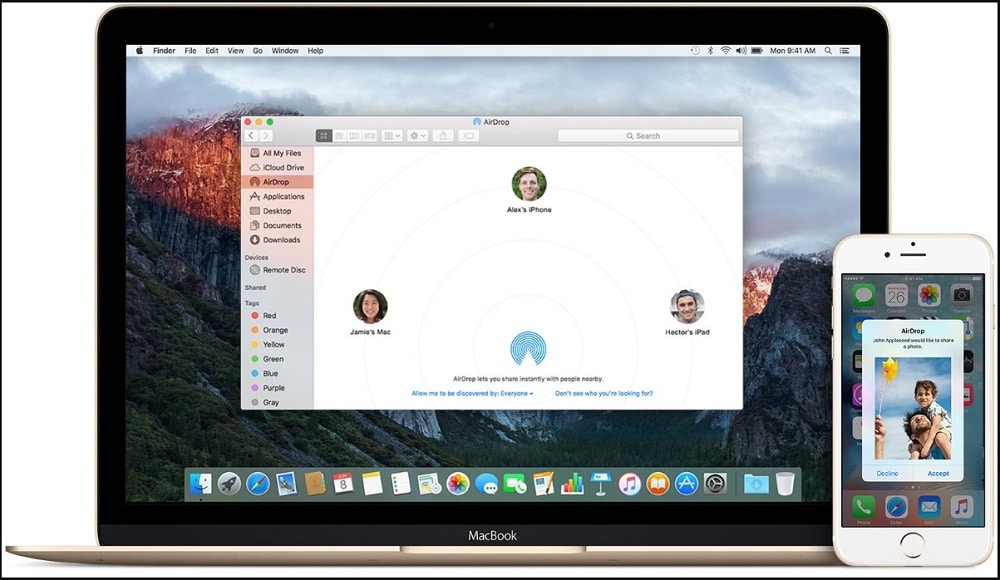
There are two ways to get this done. The first way is to share content from the Finder:
Step 1: Open the Finder.
Step 2: Click on GO and then click on Airdrop. “However, Airdrop can also be found on the sidebar of the Finder window”.
Step 3: On the airdrop window, you will see all Airdrop users who are within your range.
Step 4: Drag and drop a document or documents or any other content/file over to the intended recipient in the window.
The second way is by the use of the Share Feature:
Step 1: Open the file or item you would like to share.
Step 2: Click on Share (it is represented by an Upward Facing Arrow within the app).
Step 3: Choose Airdrop from the Share Menu.
Step 4: Locate and select a recipient from the Airdrop sheet.
Step 5: Ask the recipient to Accept the files to be sent.
Step 6: Click on Done.
Make devices visible on Airdrop
Sometimes, your AirDrop name isn’t visible to devices around. This can seriously impair the transfer of files between your device and the senders. to fix this, proceed as follows:
Step 1: On Airdrop, click on Control Center to check your settings.
Step 2: If your Airdrop is set to receive content from Contacts Only (it means that both the sender and receiver IDs must be in the Contacts app on your device).
Step 3: Change the Contacts Only option to ‘Everyone’.
To use Airdrop, ensure that Personal Hotpot is turned off.
To fix this issue on Mac:
Step 1: Turn on Airdrop.
Step 2: Click on Go and then choose Airdrop.
Step 3: Check the Allow Me to be Discovered
OR
Step 1: Turn on Airdrop.
Step 2: Choose Go and then Airdrop from the Finder’s Menu bar.
Step 3: In the Setting and Privacy, turn off Block All Incoming Connections.
Conclusion
That is all for this post on how to change your AirDrop name. We hope now you can comfortably change the name of your AirDrop to a more familiar one. We hope you found the most valuable and informative. If you have any suggestions or even questions, be sure to drop them in the comments section below.