
Are you looking for a guide on how to add proxies to your Windows computer? Come in now to read our article where we describe two methods to get that done easily.
Adding a proxy to windows requires specific procedures to be followed. As an organization or digital marketer whose activities primarily revolve around the internet, privacy should be a priority. Accessing the online space with an open-access network with your IP address exposed is not the way to go because of privacy and security reasons.
There are basically 3 tools you can use to protect the privacy of your IP address and these include proxies, VPN software, and the Tor browser. Our focus in this article is on proxies and we will show you to configure proxies on Windows here.
Why Use Proxy in Windows?
When it comes to proxies, the ‘WHY’ often pops up compared to the benefit packed with it. The use of proxies in windows has different vitality, especially if the system has frequent online services to cater to. Some of these use cases are:
Improve privacy and anonymity

The use of proxies will allow you to display an anonymous presence while on the internet by keeping the interface between you and your website of interest shielded. Also, since the IP noticeable on this website is that of the proxy, it improves your privacy from public eyes, creating solid ground to effortlessly source and extract the information and data you need.
Increase speed and performance
Caching is a term in a proxy server that refers to temporal storage. Unlike a regular network, whenever a website sends a particular request multiple times using a proxy, the site information is stored in the inbuilt cache so that when such subsequent request access is needed, it retrieves it quickly without processes involved. Hence, increasing the speed and saving bandwidth use on the system.
Bypass geo-restrictions
The most challenging factor in collecting data and information is seldom down on censorship. Sometimes you need data so severely, but because of its restriction, you have no access. Yet another reason why proxy is essential in a window PC that surfs the web frequently. With a proxy, you can bypass and gain access to geo-restricted locations and content without getting detected or blocked.
Increase security

Being secure on the internet is a value-packed in proxies. As several malicious actors are on the internet, letting open access to your system will prompt the unknown use of your IP address. Online security is a big issue today, and the advancement in technology gives rise to tons of unique intrusions. So far, to save yourself and your windows PC from this, proxies are the go-getter to keep you hidden.
Method of Adding Proxy on Windows
There are different methods of adding a proxy to your windows. In this article, we will be getting down on the two main approaches.
Method 1: Default Settings
This method revolves around the proxy settings that come with your windows, regardless of the version. The settings deal with manually inputting the IP address and port number of the proxy you choose. The core strength here is that once you set a proxy by default, you don’t have to enter the proxy host and port repeatedly. But you can’t set specific rules on some programs not to be bypassed.
Steps for Setting Default Proxy in Window
In this section, we will look at the process of adding proxies to Windows 10 and 11. Let’s get started.
How to Add Proxy in Window
Step 1: Click on the start menu
Step 2: On the window, go to settings or type setting on the search bar, and click on it. On the display setting menu, click on Network & Internet.

Step 3: At the bottom of the left-hand side, click on proxy. By default, it automatically detects settings.
Step 4: From the display proxy setup, you can either use setup script by switching it on to toggle your service provider and add the script address, then save. Or set up the proxy manually, which we would do here.
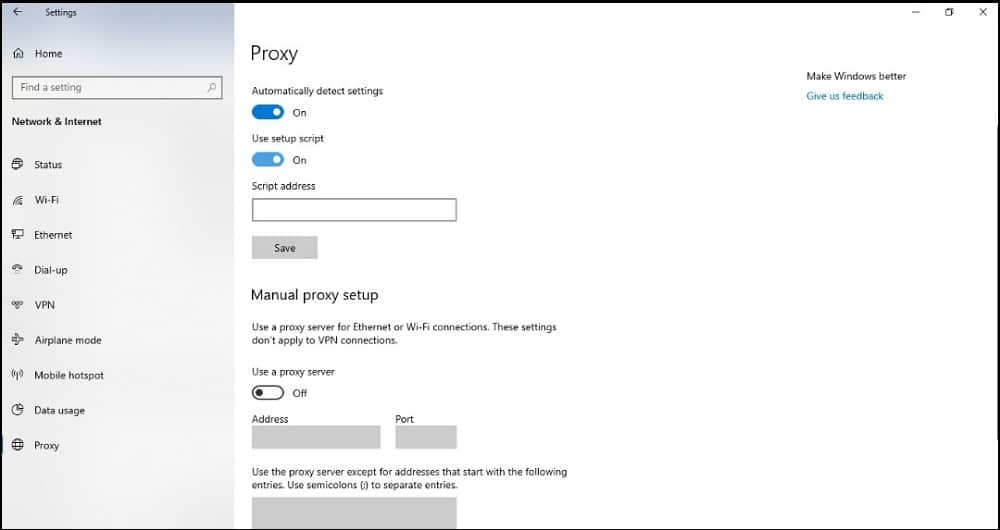
Step 5: To proceed with the manual setup, click to switch on using a proxy server under the manual setting
Step 6: Click on don’t use proxy on a local network so that if you want to access any local files, it will not route you through the proxy.
Step 7: After that, you can go ahead and purchase a proxy from any provider of your choice.
Step 8: Input the details of the IP address or proxy server name and port number details given by the provider. Then,
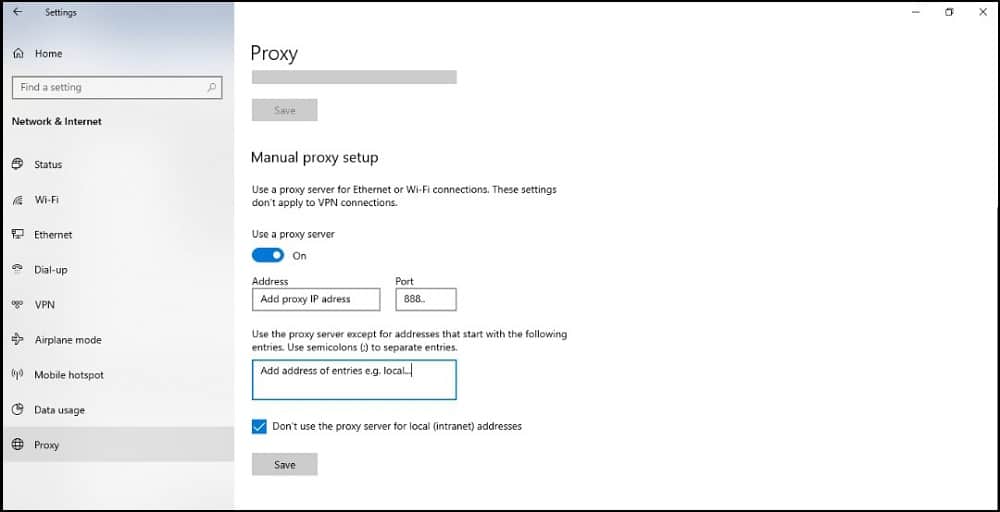
Step 9: Click save.
Whichever method you use in acquiring your proxy, you can Google your IP address to verify if you are on a proxy or not — as your browser IP address will change to that of the proxy server.
Method 2: Use Proxifier
Proxifier is an application that serves as a proxy client to force all of your web traffic via a proxy. This app works from the system-level and as such, there is no way an application will bypass it. It is currently available for only Windows and macOS.
Why is Proxifier Best for Setting Proxies
The purpose of a proxifier is to help route all internet traffic through proxies. For a window PC that does not come with a default proxy setting, the only way to use proxies on such a system is to install a proxifier. Proxies are very vital if what you do majorly deals with getting publicly on the internet, which is not safe most times as the chances of entangling with lots of unauthorized circumstances are high. But with a proxy, such won’t happen.
Interestingly, using a proxifier gives room for proxification, i.e., a rule set on every system browsing online by setting up a proxy server and routing these rules through a proxifier. These rules foster some set boundaries, be it at a personal or organizational level.
Steps to Set Up Proxifier
Now you know what a proxifier means, let’s learn how to set proxies on a proxifier.
Step 1: Download and install proxifier from http://www.proxifier.com__CODEX_PROTECTED_8b29adc430784446_83__
Step 2: After downloading, run it to open, and in the upper left corner, click on the profile
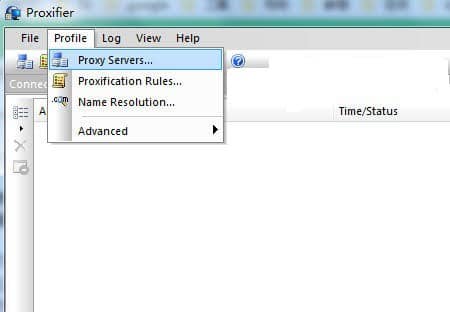
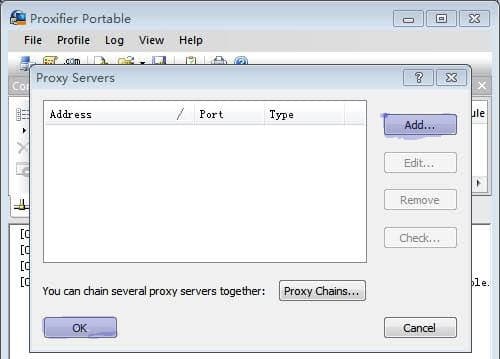
Step 3: From the sub-menu, select proxy server, and from the open window, set new or edit existing proxies. Here we would be setting a new proxy.
Step 4: Click on the Add button and enter to specify the IP address and port number of the proxy server. Depending on the proxy type you choose to use, either SOCKS5, SOCKS4, or HTTPS, select it from the protocol field. If your proxy is free, then nothing else is needed. But if it’s personal with authorization, you must set a login username and password.
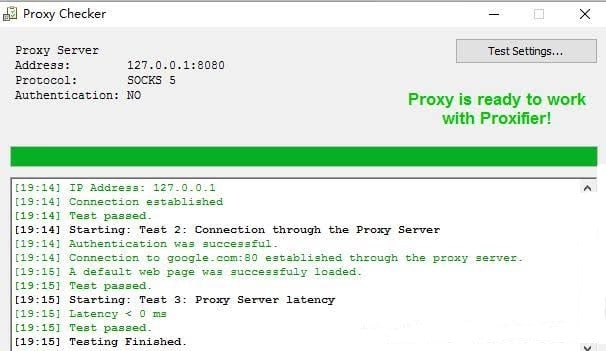
Step 5: Select Enable on the authentication field, enter the username and password, and click on check to verify the performance of the proxy.
Step 6: When the checking is complete, a green write-up will show saying; your proxy is ready to work with the proxifier, then, Click OK. But if it shows red, that is, you have inputted something wrongly, or your proxy is not working, though, that happens when you use free proxies.
Step 7: The program will ask to use a proxy by default for all programs; click yes or no; the choice is yours to make.
Step 8: The newly created proxy profile will pop up. You can further add more proxies or close the window.
Now, if you want to set rules for a specific program
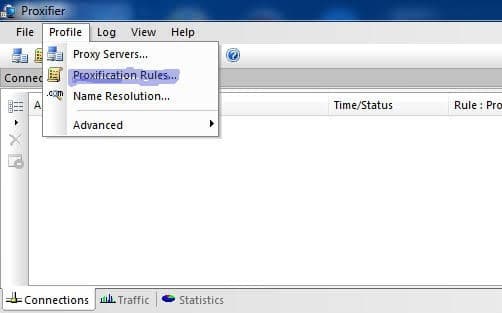
Step 9: From the upper left corner, click on profile,
Step 10: Click on proxification rule and click add.
Step 11: Enter a name for the rule. Select the program on which you will configure your proxy. In the applications field, click on browse to select the program on which you want to set the proxy.
Step 12: On the Action field, select the proxy you added on the proxifier to enable default. After that, Click OK.
Step 13: To switch off the proxy connection, go to profile, click on proxification rules and uncheck the proxy rule. Or exit Proxifier.
Conclusion
Adding proxies in windows shouldn’t be a difficult task but should be seen as a must if your work requires you always to be online. Using your system via proxies can save many network issues and malicious bypassing. It can aid faster speed in browsing, store some previously visited sites to enable quick performance, reduce bandwidth usage, and grant access to censorship restrictions, to mention a few.