
Do you know you can use proxies on iPhone and benefit from all of the freedoms proxies give from your mobile phone. Come in now to learn the step by step guide on how to get that done.
Some very vital information can be hidden by website owners from users in certain countries. This is not necessarily to punish users from such countries; it is just a policy. But this policy could stand in your way of getting access to this information and now, you will have to bypass the barrier to get it. But how do you do that? Through proxies.
Also, proxies can be used by schools to control what information students can get access to and what they can’t, websites they can and can’t visit. Generally, to monitor their Internet activities. But first, they have to set up a proxy, which is what we are going to learn about in a bit.
Why Use a Proxy on iPhone?
Since the advent of smartphones, the use of proxies has become more popular and not reserved for computers only. Many iPhone users use proxies for various reasons which may include personal reasons. Below are some of the popular reasons for using a proxy on an iPhone.
Bypassing Geo-restrictions
One of the popular reasons why people use proxies is to break through the barriers of geo-location restriction. Some websites do not allow traffic from certain locations to their platform. With a proxy, this won’t be a problem because you can easily gain access to such a website. All you have to do is connect your proxy which routes traffic through its IP rather than yours. And now, your proxy will be seen as a real human from an approved location due to its IP, while you remain anonymous.
Getting Access to Restricted Contents
Some websites will blacklist your IP address from accessing them for some reasons. Either because your IP has been used for spamming their site or you have even been blocked from accessing the site. In this case, all you need to gain access to the site is to change your IP address. With a change of IP, you can create a new account and access the site as a different user in other to consume the web content you have been blacked from. Proxies are some of the best tools for getting this done.
Additional Security/Anonymity
When you access the Internet on your iPhone, you’re doing so with the IP and location of your proxy server rather than yours. This way, your real IP address is hidden and thus, gives you the liberty to roam the Internet with an anonymous identity. Hackers who are usually on the prowl looking for loose ends can’t find you when you are using a proxy. Instead, you will find them first. With a proxy, you’ll know if a website contains malware or phishing links, and steer away from them by blocking access to them.
Saves Bandwidth and Improves Speed
Some proxies use cache to know what websites you visit very often and save them in their memory. So when next you want to visit that page, it won’t have to connect to the Internet to fetch it out. It just searches its memory instead and sees if it has that page saved. If it has, it’ll send it to you straight up. If it hasn’t, it’ll keep a record of such a website, as long as you visit it often. This way, your bandwidth is saved your browsing speed is improved.
Methods for Adding Proxies on iPhone
Unlike in the case of Android where you have numerous ways of adding proxies including the use of Postern, a Proxifier-like app, there is only one method of adding proxies on iPhone. The only method for adding proxies is by the Wi-Fi manual method.
WiFi Manual Settings
The WiFi manual settings involve highlighting a WiFi network you have previously connected to and editing the informations manually with your own proxy. When done successfully, your phone begins to work according to the proxy information you provided. Let’s find out how to set it up below.
Step 1: Go to your iPhone Settings
Step 2: Select WiFi
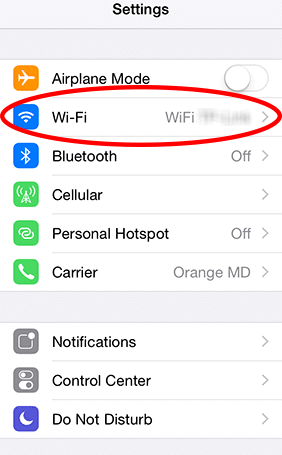
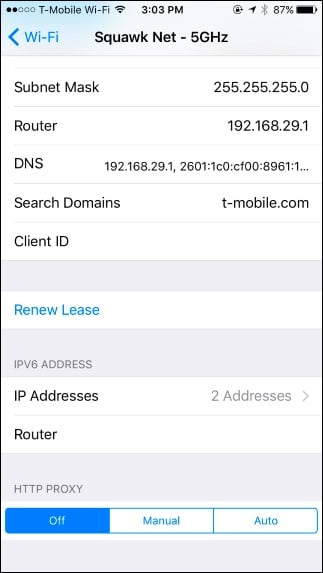
Step 3: Tap on the ‘i’ icon next to the WiFi network you wish to edit
![]()
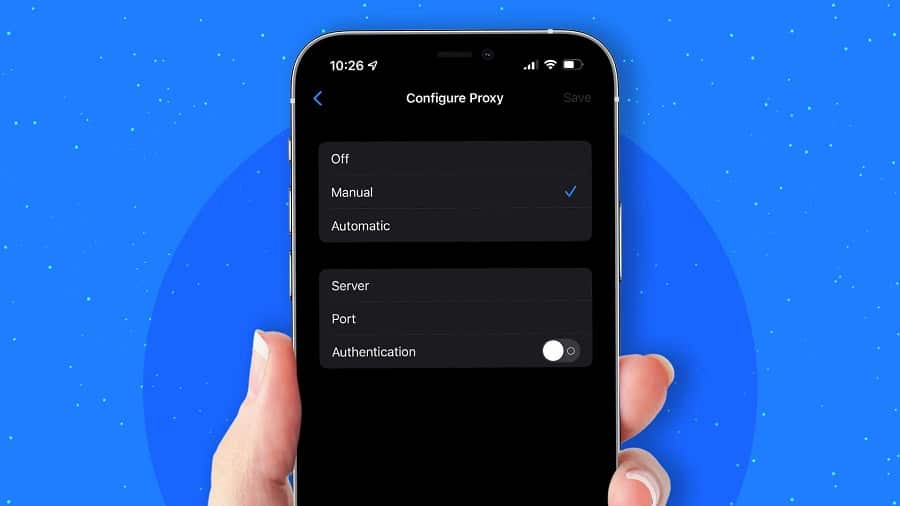
Step 4: Scroll down to the bottom and you’ll find an option for HTTP proxy titled ‘configure proxy’. This is usually turned off by default. Tap on it.
Step 5: You can either set it up to Auto for your device to automatically detect your proxy or to Manual if you wish to do the set-up yourself. For this tutorial, we’re going with the manual option, so click on that to continue
Step 6: You’ll find Authentication just below which is usually also toggled off as well by default. Turn it on if the proxy requires you to input a username or password, or both
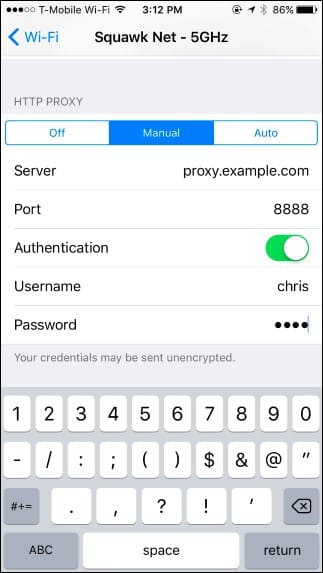
Step 7: Select Server and input your preferred proxy address.
Step 8: Select Port and enter your proxy’s port
Step 9: Tap Save to enable the settings
Once done, your internet traffic will be channelled through the proxy. And you can change your proxy anytime you want or even switch it off. All you have to do is follow the steps above to achieve what you want. Note that the proxy settings you have just done are just for one WiFi network. If you wish to manually configure all your WiFi networks to have different proxies which serve different purposes, you can follow the steps above to set them up.
Sometimes, you may encounter difficulty in connecting to the Internet. This may be a result of the wrong proxy setup. You can review the settings you just did to see if you made mistakes anywhere, or even contact the proxy provider.
Strengths of WiFi Manual Proxy Settings
- No Expertise Needed: To add a proxy on iPhone and getting it running does not require you to have any technical know-how before setting up your proxy. All that is needed are your proxy details which your proxy provider will make available to you on purchase, and your ability to follow simple instructions. The two most important details to pay attention to are the proxy IP and port.
- No Third-Party App Required: If you are thinking that you’ll need a third-party app to get your WiFi proxy running, then you’re incorrect. All that is needed is the correct details of your proxy as any incorrect detail could hinder its connection.
Weakness of WiFi Manual Proxy Settings
- Works Only for the WiFi: This means that you will need to configure the proxies for each Wi-Fi you connect to. This can be a lot of tasks for you. It is also important you know that many applications on your iPhone will disregard this settings.
- Unencrypted: Many proxies use SSL encryption, which is not as premium as it sounds in offering online security. And not even all proxies use this encryption. This means chances are that you might be using a proxy that doesn’t use encryption, which could leak your Internet activities. This in turn makes you vulnerable to hackers who are looking for sensitive details to use against you.
Conclusion
Using a proxy is good, especially if you fear that your IP will be revealed to a website you forbid to see it. While you are at it, please endeavor to use a trustworthy proxy supplier to keep your details intact and to also help you get the job done. Free proxies are good but cannot be completely trusted. Go for paid proxies for better security or inspect the free proxies properly before you give it a trial.
This article only seeks to teach you ways to add a proxy to an iPhone and does not encourage malicious tendencies in any way. We will not be responsible for what you choose to do with the information in this article.
That said, we hope that you have learnt a lot from it. Good luck in achieving your aims.
